UDIM-Picker
The UDIM-picker allows you to easily move your uv’s between the different UDIM’s, that Giants make available for the shaders, with a visual representation of each material. It can move your UV’s directly to a specific UDIM material or relative to their current position. It also has easier access for certain UV-related settings.
Note
Currently this is implemented for the 40 UDIM’s available for the vehicleShader
Shortcut
To access the UDIM-picker press Ctrl+U, it will show up as a pie menu.
It is available as a shortcut in both the UV Editor and the 3D Viewport (if it is in Edit Mode)
If one wishes to change this default keybinding it can be found in the following two places:
Or more easily, by searching for “UDIM” in the search field within , which should give you something similar to the following image

Easiest way to change the shortcut is by searching for “UDIM” in the keymap
Usage
In general the UDIM-Picker has two basic functions. To move your UV’s to a specific UDIM-tile or to move them one tile in a specific direction.
The UDIM-Picker works on faces and will ignore any vertex/edge selected that isn’t part of a whole face. This is to make uv-island detection easier (Blender does not have a built-in function for this) and due to the fact that you only want to move entire uv-islands around anyway. This isn’t to say that you have to be in face selection mode, it will work from any selection mode, you just have to pick at least one entire face worth of vertices/edges for anything to happen.
It is also smart about which UV’s you have selected and will divide your selection into separate UV-islands and move them as if you had selected them individually and moved them around.
This means that you can select UV’s from all over your UV-space and have them move into the same UV-tile (If eg. you changed your mind or want to test out a specific material) or you can select several UV’s all over different tiles and move them relatively one tile to the left (if you need that for some reason)
What the UV-Picker does not do is to try and place your UV’s for you. So it keeps whatever placement you have done, but simply changes which tile it appears in. So fx. if a uv-vertex is at (0.8,0.65) and you move it to tile (3,5), your vertex will now be at (3.8,5.65) This also means that if you move several faces that would have overlapped if placed in the regular UV-tile, they will overlap when moved to the new tile.
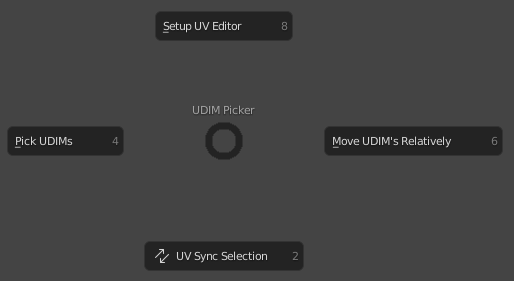
The UDIM-Picker as seen in the UV Editor, with an extra option for setting it up for UDIM’s.
Note
Some form of packing could be implemented in the future, but people use several different addons for this and this needs to be accounted for in the implementation
Selection
The UDIM-Picker works both in the UV Editor and in the 3D Viewport. This means that you can work directly on the 3D-model and select faces, which you can then move to the correct UDIM-material, without interacting with the UV Editor. Although this requires you to enable UV Sync in the UV Editor, but there is a shortcut for it directly in the UDIM-Picker menu.
The UDIM-Picker also works without UV Sync enabled, but then you have to use the UV Editor for selecting your UV’s.
Hint
If you enable UV sync you can move your UV’s around from the 3D Viewport, without going into the UV Editor
Caution
If you use the UDIM-Picker in the 3D Viewport without having a UV-Editor window open and UV sync turned off. Then you won’t be able to move around your UV’s! The addon will warn you of this in the blender log, to hopefully save you some headaches.
Move Relative
This mode moves whatever UV’s you have selected in the direction that you choose. The window is draggable and it stays open until you click OK or it loses focus. So you can click as many times as you would like to move your UDIM’s into place.
The menu should be pretty self-explanatory, but just to clarify, the middle square button resets the UDIM’s to the (0,0) tile.
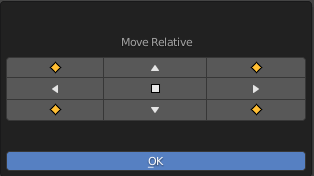
The movement menu for moving the UV’s relatively. There is options for up, down, left, right and diagonally plus an option to reset the UV’s to tile (0,0)
Move to UV-Tile
In this mode your UV’s will be moved to the UDIM-tile specified by the material you select in the menu. The menu shows you a preview of all the currently available materials and is arranged in the order of the UDIM’s themselves (to hopefully make it easier if you are used to looking them up in a reference sheet)
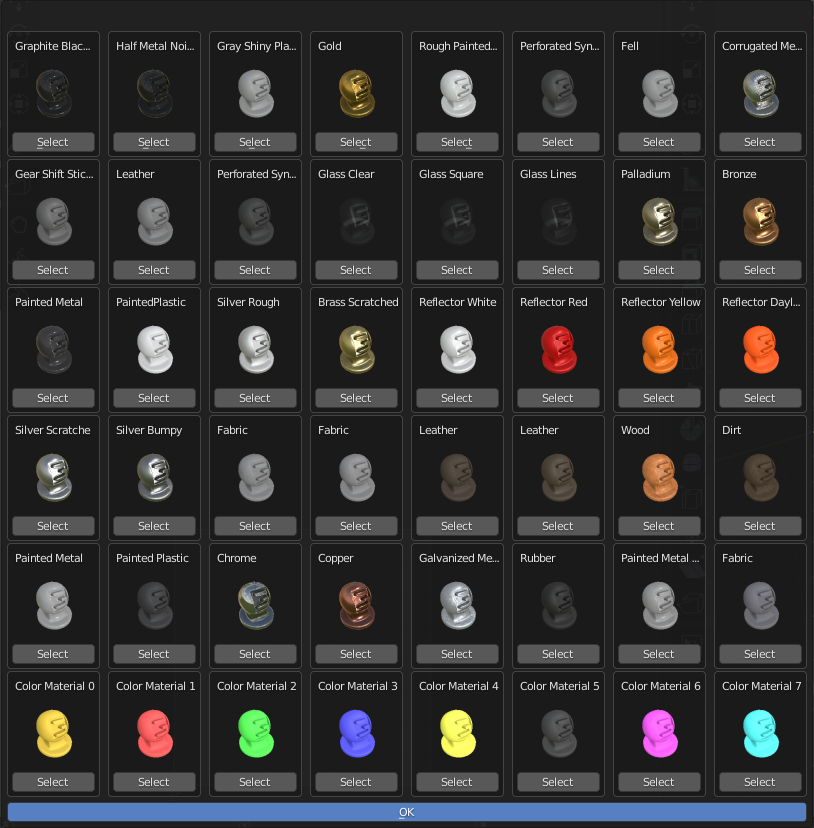
The preview menu for moving the UV’s to a specific UDIM-tile. The materials are laid out in the same grid as the UDIM-tiles themselves for easy referencing.
Note
Thanks to Redphoenix and Wopster for providing the renders of the UDIM materials
UV Editor specific options
When the UDIM-Picker is activated within the UV Editor and extra option appears for setting up the UV Editor for working with the UDIM’s. Currently the only thing this option does is to resize the UDIM grid, to make it a bit easier to see where you have placed your UDIM’s. Future updates might include extra options.
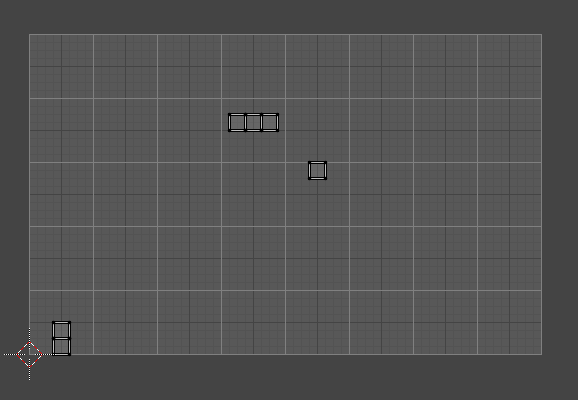
This grid makes it a bit easier to distinguish where the different UDIM-tiles are and how you have placed your UV’s. The eight color tiles, would be placed below the bottom row, since blender does not officially support negative UDIM-tile indices
Examples
None yet, will provide some examples of basic usage and more creative approaches at some point.